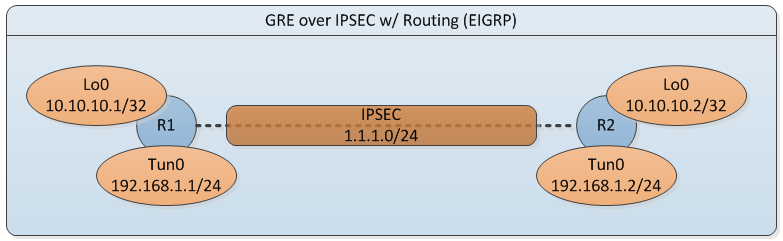
We'll use the same simple topology from my previous blogtorial "Configuring GRE over IPSEC w/ Routing".
Key notes regarding IPSEC VTI
- Less overhead
- Single protocol encapsulation only
- Multicast can be tunneled using VTI
- Tunnel is always on and no interesting traffic is needed to bring up the tunnel
- If you have a misconfiguration tunnel simply wont come up
- Meaning status / line protocol is based on IPSEC coming up correctly
As always let's start by configuring the interfaces on the routers so we have L3 reachability between the routers.
 R1#show run int gig1.12
 Building configuration...
 Current configuration : 95 bytes
 !
 interface GigabitEthernet1.12
  encapsulation dot1Q 12
  ip address 1.1.1.1 255.255.255.0
 end

 R2#show run int gig1.12
 Building configuration...
 Current configuration : 95 bytes
 !
 interface GigabitEthernet1.12
  encapsulation dot1Q 12
  ip address 1.1.1.2 255.255.255.0
 end
 R1#ping 1.1.1.2
 Type escape sequence to abort.
 Sending 5, 100-byte ICMP Echos to 1.1.1.2, timeout is 2 seconds:
 !!!!!
 Success rate is 100 percent (5/5), round-trip min/avg/max = 4/4/5 ms
Now let's configure the Generic Routing Encapsulation (GRE) tunnel on both routers.
 R1#sh run int tun0
 Building configuration...
 Current configuration : 139 bytes
 !
 interface Tunnel0
  ip address 192.168.1.1 255.255.255.0
  ip mtu 1400
  tunnel source GigabitEthernet1.12
  tunnel destination 1.1.1.2
 end

 R2#sh run int tun0
 Building configuration...
 Current configuration : 139 bytes
 !
 interface Tunnel0
  ip address 192.168.1.2 255.255.255.0
  ip mtu 1400
  tunnel source GigabitEthernet1.12
  tunnel destination 1.1.1.1
 end
Notice that I am setting the MTU on the tunnel interface to account for the GRE overhead so routers do not have to fragment the packets. Keep in mind that GRE adds extra 24 bytes of overhead (4 byte GRE Header + 20 byte IP Header). See below on the packet capture between 192.168.1.1 and 192.168.1.2.

Now let's move on to the configuring basic IPSEC Profile between the routers.
R1#
 !!--ISAKMP policy
 crypto isakmp policy 10
  encr 3des
  hash md5
  authentication pre-share
  group 5

 !!--Next let's configure the transform-set (ESP / AH) parameters and the pre-shared key between the routers
  crypto isakmp key CISCO address 1.1.1.2
  crypto ipsec transform-set AES-128-SHA-1 esp-aes esp-sha-hmac

 !!--Create the crypto ipsec profile and set the transform set
 crypto ipsec profile IPSEC_VTI
  set transform-set AES-128-SHA-1
R2#
 !!--ISAKMP policy
 crypto isakmp policy 10
  encr 3des
  hash md5
  authentication pre-share
  group 5

 !!--Next let's configure the transform-set (ESP / AH) parameters and the pre-shared key between the routers
  crypto isakmp key CISCO address 1.1.1.1
  crypto ipsec transform-set AES-128-SHA-1 esp-aes esp-sha-hmac

 !!--Create the crypto ipsec profile and set the transform set
 crypto ipsec profile IPSEC_VTI
  set transform-set AES-128-SHA-1
Now apply the IPSEC profile to the tunnel interface.
 R1#sh run int tun0
 Building configuration...
 Current configuration : 182 bytes
 !
 interface Tunnel0
  ip address 192.168.1.1 255.255.255.0
  ip mtu 1400
  tunnel source GigabitEthernet1.12
  tunnel destination 1.1.1.2
  tunnel protection ipsec profile IPSEC_VTI
 end
 R2#sh run int tun0
 Building configuration...
 Current configuration : 182 bytes
 !
 interface Tunnel0
  ip address 192.168.1.2 255.255.255.0
  ip mtu 1400
  tunnel source GigabitEthernet1.12
  tunnel destination 1.1.1.1
  tunnel protection ipsec profile IPSEC_VTI
 end
Notice that I am not applying the IPSEC profile to Gig1.12 as I did with my previous blogtorial. This time you apply it directly on the tunnel interface and anything going over the tunnel interface will be encapsulated.
Also notice that there is only security association being created so less stress on the CPU.
 R1# ping 192.168.1.2
 Type escape sequence to abort.
 Sending 5, 100-byte ICMP Echos to 192.168.1.2, timeout is 2 seconds:
 !!!!!
 Success rate is 100 percent (5/5), round-trip min/avg/max = 4/4/4 ms
 R1#show crypto ipsec sa
 interface: Tunnel0
   Crypto map tag: Tunnel0-head-0, local addr 1.1.1.1
   protected vrf: (none)
   local ident (addr/mask/prot/port): (1.1.1.1/255.255.255.255/47/0)
   remote ident (addr/mask/prot/port): (1.1.1.2/255.255.255.255/47/0)
   current_peer 1.1.1.2 port 500
    PERMIT, flags={origin_is_acl,}
   #pkts encaps: 5, #pkts encrypt: 5, #pkts digest: 5
   #pkts decaps: 5, #pkts decrypt: 5, #pkts verify: 5
In conclusion, IPSEC VTI greatly reduces the stress on the CPU and simplifies the configuration.
Many more articles to come so ....
Please subscribe/comment/+1 if you like my posts as it keeps me motivated to write more and spread the knowledge.
No comments:
Post a Comment